 Hosen MD Altaf
Today I will describe how to host Django applications in shared hosting. In this article, we use Namecheap because it has default python-support. When I start hosting my Django application on shared hosting for the first time it takes almost two days to successfully host my application, due to a lack of good resources. I will try to overcome that problem with a depth overview. Hopefully, if you follow the instructions correctly you don't need to walk around any other place. You can use this as a guide for hosting Django applications in Namecheap shared hosting plan,
Clarify some wrong information
Some Miss understand I want to clarify I see on youtube and many blogs that only the 2.2 version of Django can host on shared hosting. You cannot host python Django on shared hosting. All of those are meth. In this tutorial, you will see we use the latest version of Django and host successfully in Namecheap. Let's get started:
Step 1) Create a python app
- First login to your Namecheap account,
- Then go to dashboard, after that from sidebar click on hosting list.
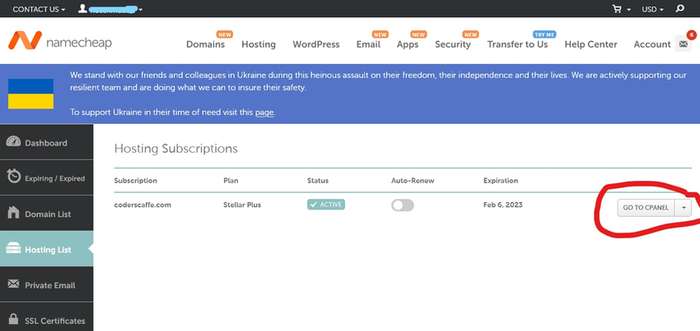
- Here you will see your main domain name click on GO TO CPANEL button. It will take you to the Cpanel dashboard page.
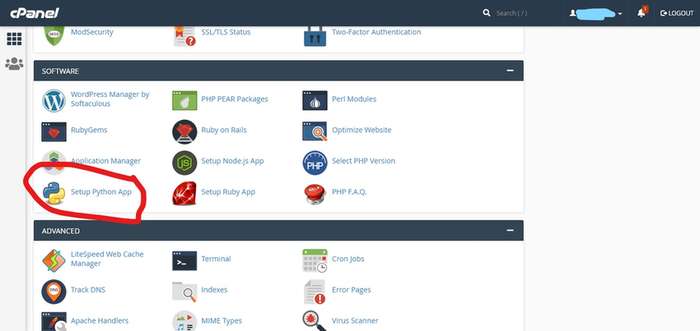
- At first, you need to create a python app from the Cpanel dashboard. Keep in mind when choosing the python version you should choose the 3.7.12 version otherwise you cannot install the pillow and some other packages.
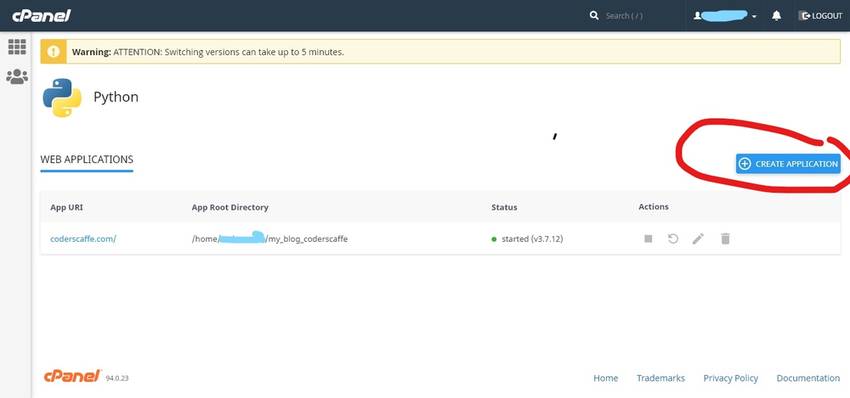
- Here you need to write your python app name as you wanted.
- And set the Application URL as your domain name ' ex:yourdomain.com'.Then click on save. Congrats you just complete your first stage.
Step 2) File storage setup

So you have now two folders in your file manager. One is your domain name ex: 'yourdomainname.com' and another one is just created python app ex; 'yourdomainname'. Keep in mind that your domain name should include the .htacces file, it's so important please see clearly whether is included or not in your domain name otherwise you will get an error. After that, you need to zip your project folder and upload it this way for deploy django.
- Domain name folder(ex:yourdomainname.com),will contain the project static and media folder
- Your python app folder will contain your main codebase project main root and all apps, templates folder etc.
- And then you need to take all folders in one root path. Your python app will be the main directory no other subfolder cannot contain under the python app folder only the project root folder and apps will store.
**keep in mind if you are using your main domain as a Django project put your static folder in the public_html folder, otherwise static files will not load correctly.
Step 3) Setup your passenger_wsgi.py file
You will see passenger_wsgi.py in your python app root directory. In the previous step, you already take your codebase in the root of your python app. So you will find passenger_wsgi.py besides your project manage.py file. Click and enter your passenger_wsgi.py file you will see code like this.
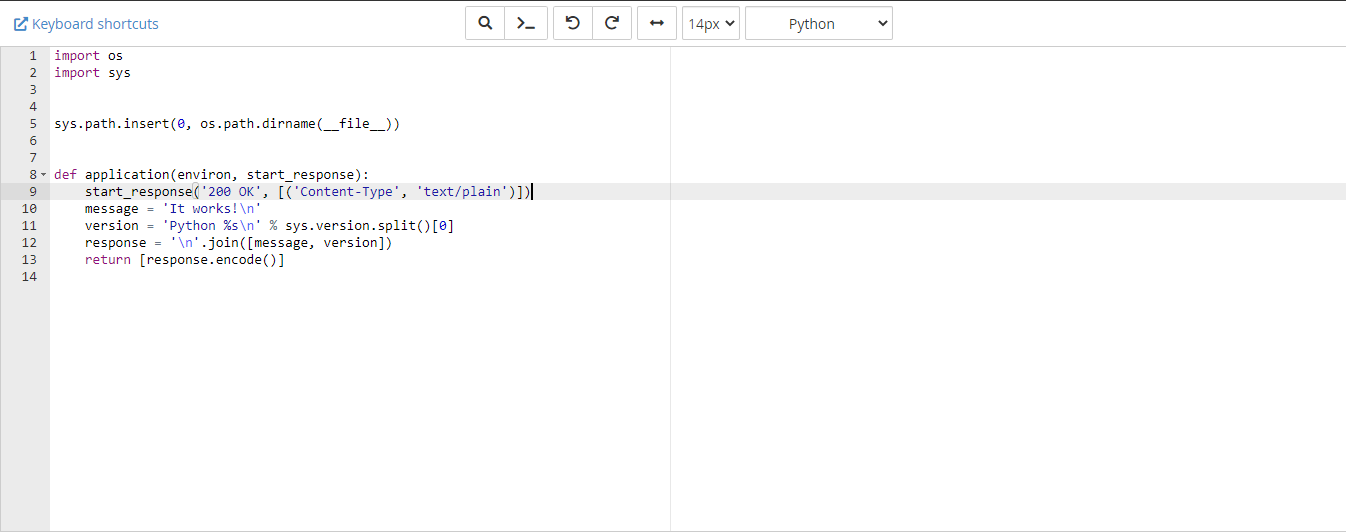
Delete all of them. Then just copy this line of code
from project_root_foldername.wsgi import application
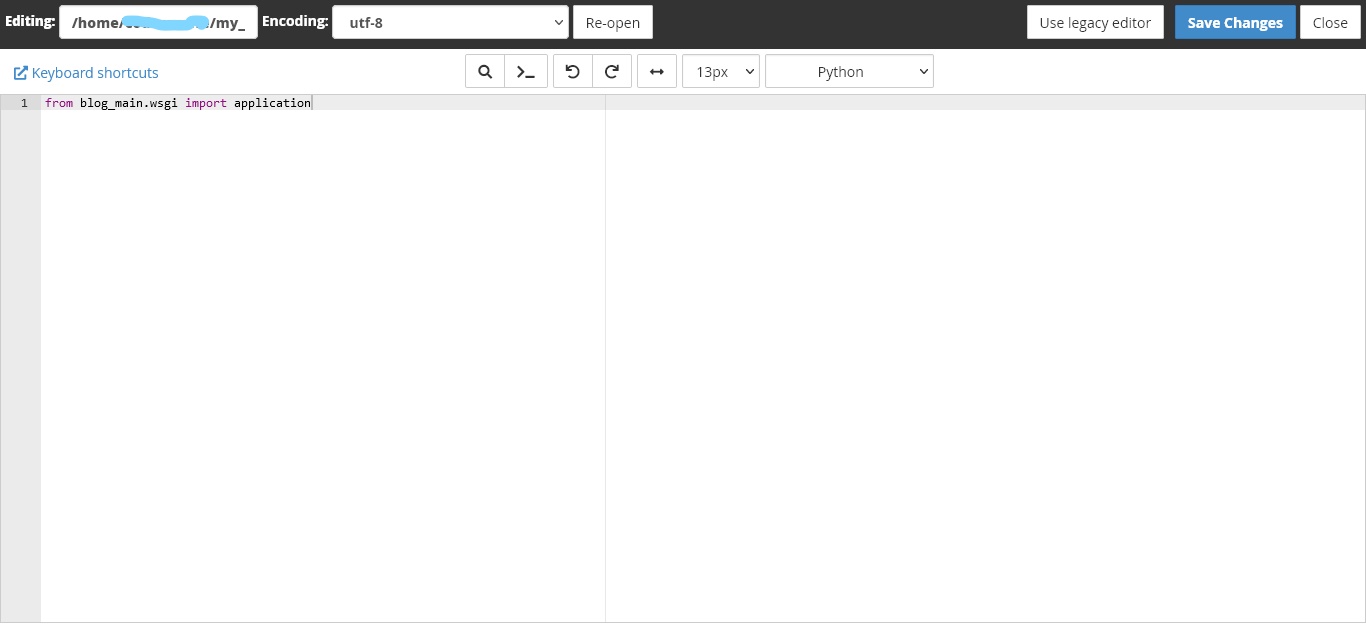
Here project_root_folder is your project name which contains your wsgi.py and seeting.py file. After that just click save it will auto-connect the wsgi file for lookup. Note that this is very important for your project. If you cannot configure correctly your project shouldn't run.
Step 4)Configure the setting.py file
So you are almost to the finishing point.
- First make DEBUG = True to DEBUG = False .It is important for production otherwise it can be easily hackable. And your user will see some errors which you never want to show them. It is suggested by Django documentation.
- After that, you need to configure ALLOWED_HOSTS. You need to put your domain name on this way:
-
ALLOWED_HOSTS = ['www.yourdomainname.com','yourdomainname.com']
Step 5) Setup static and media files
- Static and Media root configuration. The root will be as below. You will find your username top of the navbar.
STATIC_URL = '/static/'
STATIC_ROOT = '/home/username/yourdomainname.com/static'
- First, try this for media root hopefully it will work fine. If works fine don't try to second approach. Works as it is.
  MEDIA_URL = '/media/'
  MEDIA_ROOT = os.path.join(BASE_DIR, 'media')
- If previous approaches don't work properly. Just change media root as like this way. Hopefully, it will successfully work for you.
MEDIA_ROOT = '/home/username/yourdomainname.com/media'
***** Important note: If you are working with your main domain , you need to use public_html insted of your domain name. See the example below.
STATIC_URL = '/static/'
STATIC_ROOT = '/home/username/public_html/static'

And

MEDIA_URL = '/media/'
MEDIA_ROOT = '/home/username/public_html/media'
step 7) Setup commands
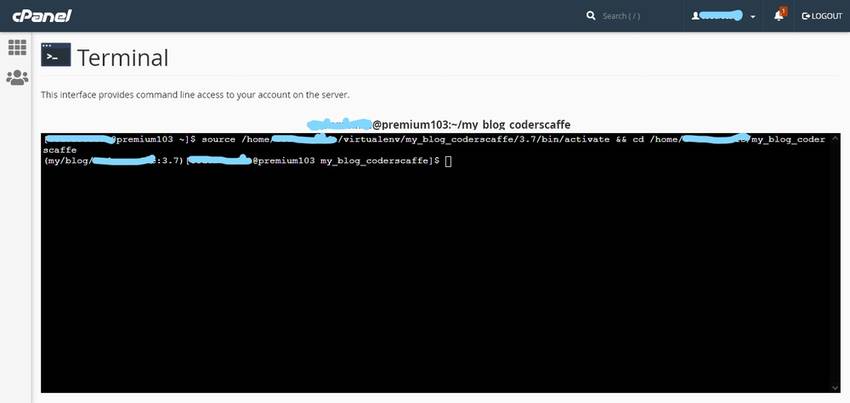
Now the final part of deploying Django. First, we have to install all dependencies from the terminal. In these steps, you need to have the terminal set up on your Cpanel dashboard. See How to enable SSH (Shell) or terminal access in cPanel Run your terminal and went to your python app and click the pen so you will enter it into the python app directory and copy the Enter to the virtual environment. To enter the virtual environment, run the command:
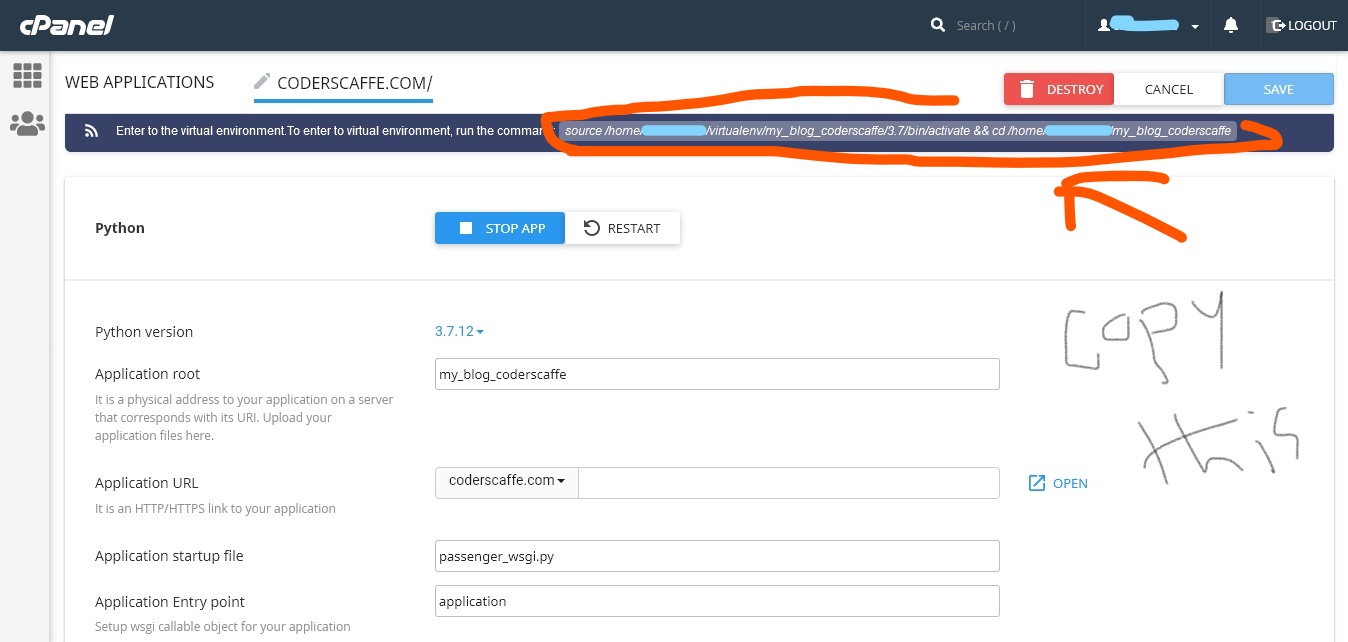
source /home/username/virtualenv/projectname/3.7/bin/activate && cd /home/username/project-name
Just click on your, own it will automatically copy code for you. Then move on to your terminal and paste those lines of code.
After that, you can install all your required packages on that directory of the Django application. Some necessary commands I write down for you. You can follow my one and other required packages as your project requirements.
- To install Django.
pip install Django
- Pillow is for image upload.If you use ImageField in your project then it will need for you. Otherwise, it has no need.
pip install pillow==8.0.0
**If you need a pillow for your project, you must use the version I used here otherwise it will not install. You will find errors.
- To collect your project static file in the same directory, as you mentioned before running this command.
python manage.py collectstatic
step 6) Setup Database
To set up the default SQLite database as it is just following those commands. If you want to connect Mysql database see here
- For database table creation and setup.Run those two commands
-
python manage.py makemigrations
python manage.py migrate
- For creating a superuser for your project run this command.
-
python manage.py createsuperuser
conclusion
Here you go! We are successfully deploying Django with our configuration and our project starts running. Test your domain now. Hopefully, you see your dream website live on the internet.
Learn How to connect the Mysql database on our Django project in Cpanel
Learn How to enable SSH (Shell) or terminal access in cPanel
Learn How to develop a full stack development project from planning to coding


There is no comment yet!